We're going to create an operations repo that creates and manages an AWS EKS cluster using Terraform and deploys a Helm chart to the cluster. We'll use BitOps to orchestrate this whole process.
To complete this tutorial you will need
- npm
- docker
- An AWS account with an aws access key and aws secret access key that has permissions to manage an EKS cluster and S3 bucket. These values should be defined as the environment variables
AWS_ACCESS_KEY_IDandAWS_SECRET_ACCESS_KEYrespectively - (optional) terraform and kubectl installed locally to verify the deployment
This tutorial involves a small EKS cluster and deploying an application to it. Because of this, there will be AWS compute charges for completing this tutorial.
If you prefer skipping ahead to the final solution, the code created for this tutorial is on Github.
Setting up our operations repo
To start, create a fresh operations repo using yeoman.
Install yeoman and generator-bitops
npm install -g yo
npm install -g @bitovi/generator-bitops
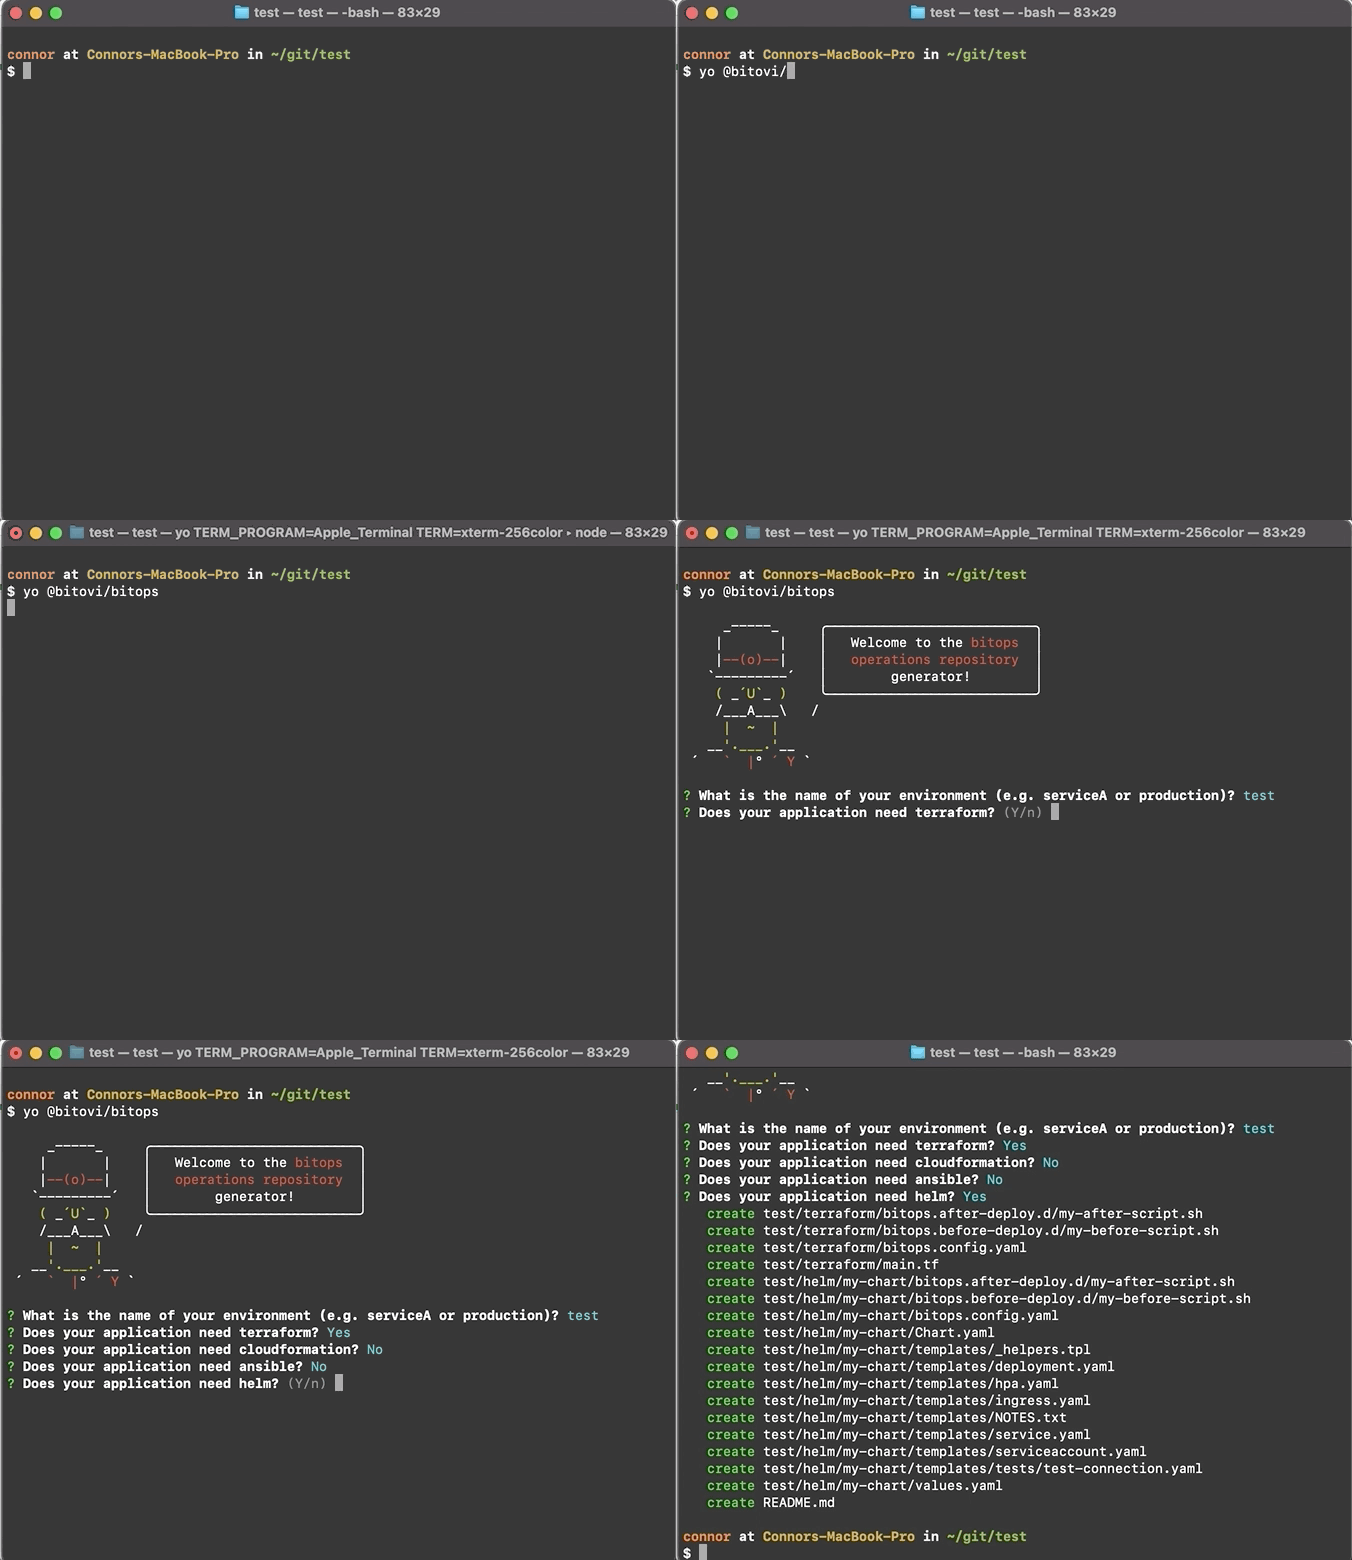
Run yo @bitovi/bitops to create an operations repo. When prompted, name your environment “test”, answer “Y” to Terraform and Helm and “N” to the other supported tools.
yo @bitovi/bitops
Understanding Operations Repo Structure
The code generated by yeoman contains a test/terraform/ directory and test/helm/ directory. When BitOps runs with the ENVIRONMENT=test environment variable, it will first run the Terraform code location within test/terraform/, then deploy every chart within test/helm/.
There is a notable difference between the helm and terraform directories. test/helm/ is a collection of directories, each of which is a fully defined helm chart. When BitOps runs, helm install will be called for each directory within test/helm/. Meanwhile, test/terraform/ is a singular bundle of terraform files and terraform apply will be called only once.
We will be writing Terraform code to create an EKS cluster and then customizing test/helm/my-chart/bitops.config.yml to tell BitOps to deploy a chart to our newly created cluster.
Managing Terraform State
Before we write any Terraform, we need to create an s3 bucket to store our terraform state files. While this is typically a manual process with Terraform, we can use the awscli installed in BitOps along with lifecycle hooks to accomplish this.
Either replace the contents of test/terraform/bitops.before-deploy.d/my-before-script.sh or create a new file called create-tf-bucket.sh with
#!/bin/bash
aws s3api create-bucket --bucket $TF_STATE_BUCKET
Any shell scripts in test/terraform/bitops.before-deploy.d/ will execute before any Terraform commands. This script will create an s3 bucket with the name of whatever we set the TF_STATE_BUCKET environment variable to.
We will need to pass in TF_STATE_BUCKET when creating a BitOps container. S3 bucket names need to be globally unique, so don’t use the same name outlined in this tutorial.
Terraform Providers
Delete test/terraform/main.tf.
Create test/terraform/providers.tf to define the providers we will be using. Replace bucket = "YOUR_BUCKET_NAME" with the name you intend to use for TF_STATE_BUCKET.
test/terraform/providers.tf
terraform {
  required_version = ">= 0.12"
  backend "s3" {
    bucket = "YOUR_BUCKET_NAME"
    key = "state"
  }
}

provider "local" {
  version = "~> 1.2"
}

provider "null" {
  version = "~> 2.1"
}

provider "template" {
  version = "~> 2.1"
}

provider "aws" {
  version = ">= 2.28.1"
  region  = "us-east-2"
}
AWS VPC
Create vpc.tf. This will create a new VPC called "bitops-vpc" with a public and private subnet for each availability zone. We use the terraform-aws-modules/vpc/aws module from the Terraform registry along with the cidrsubnet function to make this easier.
test/terraform/vpc.tf
locals {
  cidr = "10.0.0.0/16"
}

data "aws_availability_zones" "available" {}

module "vpc" {
  source  = "terraform-aws-modules/vpc/aws"
  version = "2.6.0"

  name                 = "bitops-vpc"
  cidr                 = local.cidr
  azs                  = data.aws_availability_zones.available.names
  private_subnets      = [cidrsubnet(local.cidr, 8, 1), cidrsubnet(local.cidr, 8, 2), cidrsubnet(local.cidr, 8, 3)]
  public_subnets       = [cidrsubnet(local.cidr, 8, 4), cidrsubnet(local.cidr, 8, 5), cidrsubnet(local.cidr, 8, 6)]
  enable_nat_gateway   = true
  single_nat_gateway   = true
  enable_dns_hostnames = true

  tags = {
    "kubernetes.io/cluster/${local.cluster_name}" = "shared"
  }

  public_subnet_tags = {
    "kubernetes.io/cluster/${local.cluster_name}" = "shared"
    "kubernetes.io/role/elb"                      = "1"
  }

  private_subnet_tags = {
    "kubernetes.io/cluster/${local.cluster_name}" = "shared"
    "kubernetes.io/role/internal-elb"             = "1"
  }
}
AWS Security Group
Create a blanket security group rule that will allow all our EKS worker nodes to communicate with each other.
test/terraform/security-groups.tf
resource "aws_security_group" "worker_nodes" {
  name_prefix = "all_worker_management"
  vpc_id      = module.vpc.vpc_id

  ingress {
    from_port = 22
    to_port   = 22
    protocol  = "tcp"

    cidr_blocks = [
      local.cidr
    ]
  }
}
AWS EKS Cluster
Using the terraform-aws-modules/eks/awsmodule to abstract away most of the complexity, create our EKS cluster with 3 t3.small worker nodes.
test/terraform/eks-cluster.tf
locals {
  cluster_name = "bitops-eks"
}

module "eks" {
  source          = "terraform-aws-modules/eks/aws"
  cluster_name    = local.cluster_name
  cluster_version = "1.17"
  subnets         = module.vpc.private_subnets
  vpc_id          = module.vpc.vpc_id
  manage_aws_auth = false
  node_groups = {
    test = {
      instance_type = "t3.small"
    }
  }
}
Sharing Kubeconfig
We need a kubeconfig file to allow us to connect to our cluster outside of BitOps runs. Because our cluster is managed by Terraform, we create a terraform output containing our kubeconfig file. Create output.tf with the following content. We'll use this output when verifying the deployment.
test/terraform/output.tf
output "kubeconfig" {
  description = "kubectl config as generated by the module."
  value       = module.eks.kubeconfig
}
Telling BitOps Where to Deploy Helm Chart
We named our cluster bitops-eks so we need to tells BitOps this along with the name of the release and the namespace to deploy to.
Replace test/helm/my-chart/bitops.config.yaml with the following.
test/helm/my-chart/bitops.config.yaml
helm:
  cli:
    namespace: bitops
    debug: false
    atomic: true
  options:
      release-name: bitops-eks
      kubeconfig:
        fetch:
          enabled: true
          cluster-name: bitops-eks
For more information on these configuration values and other options available, check out BitOps' official docs.
Run BitOps
Now that all our infrastructure code has been written, we can deploy it all by running BitOps. Creating an EKS cluster from scratch takes some time so the first run will take 10-20 minutes. Subsequent runs will be much faster.
Run the following command to kick off the deployment process. Ensure the AWS environment variables are set properly and you are passing your unique S3 bucket name in as TF_STATE_BUCKET.
docker run \
-e ENVIRONMENT="test" \
-e AWS_ACCESS_KEY_ID=$AWS_ACCESS_KEY_ID \
-e AWS_SECRET_ACCESS_KEY=$AWS_SECRET_ACCESS_KEY \
-e AWS_DEFAULT_REGION=$AWS_DEFAULT_REGION \
-e TF_STATE_BUCKET="YOUR_BUCKET_NAME" \
-v $(pwd):/opt/bitops_deployment \
bitovi/bitops:latest
Verify
First we need to extract our kubeconfig from our Terraform output. We'll create a kubeconfig file for ease of use:
cd eks/terraform
terraform init
terraform output kubeconfig | sed "/EOT/d" > kubeconfig
Then we can use kubectl's --kubeconfig flag to connect to our cluster
$ kubectl get deploy -n bitops --kubeconfig=kubeconfig
NAME       READY   UP-TO-DATE   AVAILABLE   AGE
my-chart   1/1     1            1           22h
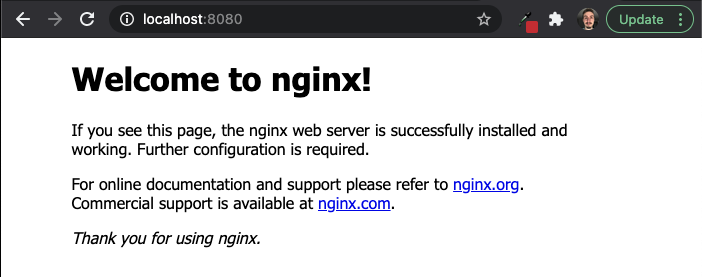
We can port forward the deployment to verify the helm chart
$ kubectl port-forward deploy/my-chart 8080:80 -n bitops --kubeconfig=kubeconfig
Forwarding from 127.0.0.1:8080 -> 80
Forwarding from [::1]:8080 -> 80
Open your browser to localhost:8080 and you should your deployment!

Cleanup
Run BitOps again with the TERRAFORM_DESTROY=true environment variable. This will tell BitOps to run terraform destroy and tear down the infrastructure created in this tutorial.
docker run \
-e ENVIRONMENT="test" \
-e AWS_ACCESS_KEY_ID=$AWS_ACCESS_KEY_ID \
-e AWS_SECRET_ACCESS_KEY=$AWS_SECRET_ACCESS_KEY \
-e AWS_DEFAULT_REGION=$AWS_DEFAULT_REGION \
-e TF_STATE_BUCKET="YOUR_BUCKET_NAME" \
-e TERRAFORM_DESTROY=true \
-v $(pwd):/opt/bitops_deployment \
bitovi/bitops:latest
Learn More
Using declarative infrastructure we’ve deployed an EKS cluster and a web application on the cluster using BitOps, Terraform and Helm.
Want to learn more about using BitOps? Check out our github, our official docs, or come hang out with us on Slack #bitops channel! We’re happy to assist you at any time in your DevOps automation journey!


