What if your frameworks could work together? Well, with a single-spa Angular application, they can! When you build a single-spa Angular application, painless migration, independent deployment, and effortless scalability are all in store.
This post will teach you about the single-spa framework and how to build a single-spa Angular application. Let’s get started.
What is Single-Spa?
Single-spa is a front-end framework focused on Micro Frontends. It’s most commonly used with Angular, AngularJS, React, and Ember, but it can be used with other frameworks.
Single-spa is so appealing because it allows your frameworks to work together, meaning your Angular application can communicate and maintain state with your React application. But that’s not all! Other benefits include:
-
Ability to migrate existing code to the single-spa framework without rewriting code
-
Independent deployment of each Micro Frontend
Create an Angular Application
To set up a single-spa Angular application, you first need to create an Angular application by running the following code below in your terminal.
ng new micro-fe-billing --routing --prefix micro-fe-billing
cd micro-fe-billing
npm i single-spa-angular
You have created an Angular application, and the npm i single-spa-angular has edited a couple of your files, like package.json updating the scripts. A complete detailed list of what it’s done can be found on the single-spa schematics.
Add and Configure Webpack
Now that your application has been created, you need to add a webpack config file and configure it in the recommended single-spa.
Start by running the code below in the terminal to create your new file, and ensure it’s at the root of the project.
touch singlespa-webpack.config.jsAdd this code to singlespa-webpack.config.js:
// singlespa-webpack.config.js

const singleSpaAngularWebpack = require('single-spa-angular/lib/webpack').default;

module.exports = (angularWebpackConfig, options) => {
  return singleSpaAngularWebpack(angularWebpackConfig, options);
}
Update package.json Scripts
The next step in creating a single-spa Angular app is to update your package.json scripts. Within your package.json, you will update scripts to disable host checking, the port where you want your app to load, and the deployed URL used for the other Micro Frontends to communicate.
// package.json
...
scripts {
  "ng": "ng",
  "build": "npm run build:single-spa",
  "start": "npm run serve:single-spa",
  "build:single-spa": "ng build --base-href /dist/app1 --output-hashing none",
  "serve:single-spa": "ng serve --disable-host-check --port 4207"
  ...
}
Add and Configure main.single-spa.ts
Next, create main.single-spa.ts in the src/ directory:
touch src/main.single-spa.tsAdd the following code block:
// main.single-spa.ts

import { enableProdMode, NgZone } from '@angular/core';

import { platformBrowserDynamic } from '@angular/platform-browser-dynamic';
import { Router } from '@angular/router';
import { AppModule } from './app/app.module';
import { singleSpaAngular, getSingleSpaExtraProviders } from 'single-spa-angular';

import { ReplaySubject } from 'rxjs';
import { AppProps } from 'single-spa';
import { setPublicPath } from "systemjs-webpack-interop";

export const singleSpaPropsSubject = new ReplaySubject<SingleSpaProps>(1)

export type SingleSpaProps = AppProps & {
// Add any custom single-spa props you have to this type def
// https://single-spa.js.org/docs/building-applications.html#custom-props
}

export const environment = {
  production: false
};

if (environment.production) {
  enableProdMode();
}

// This sets the name of your application that will be consumed when sharing data with other spa applications
setPublicPath("@bitovi/micro-fe-billing");

const lifecycles = singleSpaAngular({
  bootstrapFunction: singleSpaProps => {
    singleSpaPropsSubject.next(singleSpaProps);
    return platformBrowserDynamic(getSingleSpaExtraProviders()).bootstrapModule(AppModule);
  },
  template: '<micro-fe-billing-root />',
  Router,
  NgZone,
});

export const bootstrap = lifecycles.bootstrap;
export const mount = lifecycles.mount;
export const unmount = lifecycles.unmount;
The above line is the typical single-spa setup that you’ll see in most Angular single-spa applications. Our main.single-spa.ts helps create the browser environment for your application to run by checking the following:
-
Whether the app is in production mode
-
Adding the single-spa props for the application to behave as a single-spa application over a regular Angular application.
Configure angular.json
Once you’ve configured main.single-spa.ts, edit angular.json in the root directory. Add the following instructions for your project where you’ll have the name of your project micro-fe-billing under architect, then build
// angular.json
      ...
      "project": {
        "micro-fe-billing": {
          "architect": {
            "build": {
              "builder": "@angular-builders/custom-webpack:browser",
              "options": {
                "outputPath": "dist/app1",
                "index": "src/index.html",
                "main": "src/main.single-spa.ts",
                "customWebpackConfig": {
                  "path": "./singlespa-webpack.config.js"
                }
                ...
              },
            }
          }
        }
      }
When you run your build command, you tell your project that it uses a custom webpack configuration with a path of ./singlespa-webpack.config.js. The application will use main as the entry point and the build's output, dist/app1.
Configure tsconfig.app.json
Add the following to tsconfig.app.json. This tells the TypeScript configuration to build another TypeScript file src/main.single-spa.ts, so you need to include it in your tsconfig.app.json like this.
// tsconfig.app.json
...
  "files": [
    "src/main.ts",
    "src/main.single-spa.ts",
    "src/polyfills.ts"
  ],
...
You are ready to build/serve your newly created single-spa Angular Micro Frontend application!
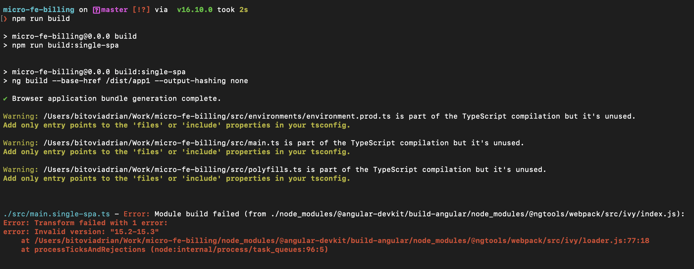
Note: Ivy Compatibility Error
You may encounter this error while building: Error: Module build failed (from ./node_modules/@angular-devkit/build-angular/node_modules/@ngtools/Youbpack/src/ivy/index.js) while building:

This error is due to Ivy’s lack of support for building to Safari, which you’ll see if you open your
browserslistrc
.
If you encounter this error, change your existing code to the code below:
// .browserslistrc
# This file is used by the build system to adjust CSS and JS output to support the specified browsers below.
# For additional information regarding the format and rule options, please see:
# https://github.com/browserslist/browserslist#queries

# For the full list of supported browsers by the Angular framework, please see:
# https://angular.io/guide/browser-support

# You can see what browsers Youre selected by your queries by running:
#   npx browserslist

last 1 Chrome version
last 1 Firefox version
There’s an open issue in single-spa to fix this, but your project will build for now with the fix above.
Wrap Up

Congratulations! You’ve successfully created a single-spa Angular application. To view the example from this post, check out this repository with everything you
accomplished today. Now you can relax knowing your frameworks can work together, making migrations and deployments seamless.
Single-spa not a day at the spa for you?
Don’t worry! We have a dedicated team of Angular consultants eager to help take your project from vision to reality. Schedule your free consultation call to get started.


![Certified Kubernetes Admin Exam Survival Guide [from a CKA]](https://www.bitovi.com/hs-fs/hubfs/Certified%20Kubernetes%20Admin%20Exam%20Survival%20Guide%20%5Bfrom%20a%20CKA%5D.png?height=117&name=Certified%20Kubernetes%20Admin%20Exam%20Survival%20Guide%20%5Bfrom%20a%20CKA%5D.png)