.svg)


Authentication is a critical part of any web application. It's important to ensure that user authentication is secure, scalable, and easy to manage.
In this blog post, we'll explore how to set up authentication with Auth0 in a React project. The @auth0/auth0-react SDK was recently updated to version 2.1.0, so that is the version we will be walking through. The process is the same for previous versions, but some of the props in the Auth0Provider have changed.
What is Auth0?
Auth0 is a popular identity and access management platform that provides authentication, authorization, and user management for web applications. With Auth0, you can add authentication to your web application without having to build your authentication system from scratch. Auth0 supports multiple identity providers such as Google, Facebook, and Twitter. It also provides various features such as multi-factor authentication, passwordless login, and social login.
Getting Started with Auth0
To get started with Auth0, you'll need to sign up for a free account at https://auth0.com/signup. Once you've signed up, you'll be directed to the Auth0 Dashboard, where you can create a new application.
Creating a New Application in Auth0
To create a new application in Auth0, follow these steps:
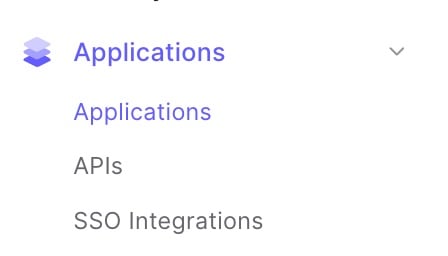
Click on the "Applications" tab on the left-hand side of the Auth0 Dashboard to expand the Applications menu, and then click Applications.
Click on the "Create Application" button located on the top right. Choose the "Single Page Web Applications" option. Enter a name for your application and click the "Create" button.

Configuring Auth0
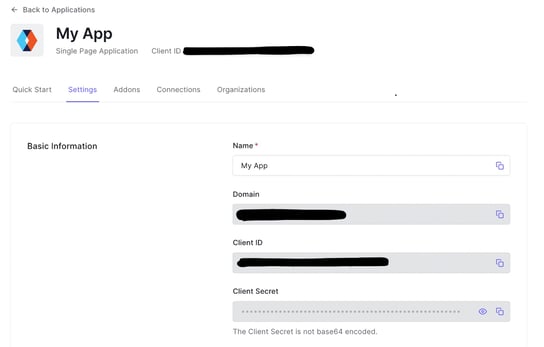
You'll use the Basic Information in your React app, but there's one last configuration item to update. Click on the Settings tab to view the basic settings for the app. Scroll down the page to Application URIs.
The important parts here are Allowed Callback URLs, Allowed Logout URLs, and Allowed Web Origins. These fields allow auth0 to secure where your app will be allowed to redirect back to in each situation. My app runs on port 3000, so I have http://localhost:3000 as my URL in each of the fields.
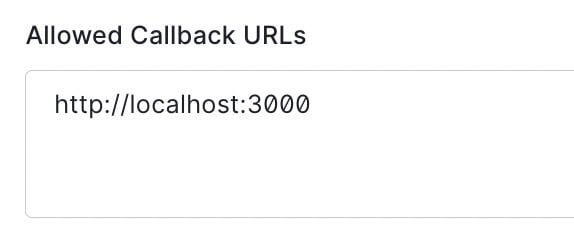
You can add several different URLs here if needed. If your app is deployed somewhere or uses an existing domain, it’s important to note that HTTPS will be required.
After adding your URL to the fields, scroll down and click Save Changes.
Configuring Your React Application
Now that you've created a new application in Auth0, you'll need to configure your React application to use Auth0 for authentication.
First, you'll need to install the Auth0 React SDK:
In your project directory terminal:
npm install @auth0/auth0-reactOnce you've installed the Auth0 React SDK, you'll need to create an Auth0Provider component in your React application. The Auth0Provider component will wrap around your entire application and provide the necessary authentication state to your components.
Here's an example of how to create an Auth0Provider component:
import React from "react";
import ReactDOM from "react-dom";
import App from "./App";
import { Auth0Provider } from "@auth0/auth0-react";

ReactDOM.render(
  <Auth0Provider
    domain={process.env.REACT_APP_AUTH0_DOMAIN}
    clientId={process.env.REACT_APP_AUTH0_CLIENT_ID}
    authorizationParams={{redirect_uri: window.location.origin}}
   >
    <React.StrictMode>
      <App />
    </React.StrictMode>
  </Auth0Provider>,
  document.getElementById("root")
);
In the example above, you'll need to replace process.env.REACT_APP_AUTH0_DOMAIN and process.env.REACT_APP_AUTH0_CLIENT_ID with your own Auth0 domain and client ID, which you can find in the Basic Information section of your app in the Auth0 Dashboard.
Protecting Your Routes
Now that you've set up the Auth0Provider component, you can protect your routes by using the Auth0React SDK's HOC withAuthenticationRequired.
You can start by creating a reusable component called ProtectedRoute. This component redirects the user automatically when they try to access the route but are not authenticated. onRedirecting will execute code before it leaves the app.
import { withAuthenticationRequired } from "@auth0/auth0-react";
import React from "react";
import { Route } from "react-router-dom";

export const ProtectedRoute = ({ component, ...args }) => (
  <Route
    component={withAuthenticationRequired(component, {
      onRedirecting: () => (
        <div>Redirecting you to login</div>
      ),
    })}
    {...args}
  />
);
You'll then add this to your App component. Below, you will always be able to access the LandingPage component. When you attempt to navigate to the /user route, if authenticated, the UserPage will display. If unauthenticated, the redirect to login will occur.
import { useAuth0 } from "@auth0/auth0-react";
import React from "react";
import { Route, Switch } from "react-router-dom";
import { ProtectedRoute } from "./components/ProtectedRoute";
import { LandingPage } from "./pages/LandingPage";
import { ProfilePage } from "./pages/UserPage";
export const App = () => {
return (
<BrowserRouter>
<Switch>
<Route path="/" exact component={LandingPage} />
<ProtectedRoute path="/user" component={UserPage} />
</Switch>
</BrowserRouter>
);
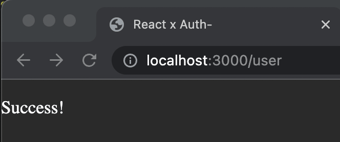
};I just added a simple ”Success!” message in UserPage for display purposes:
Here’s a peek at the LandingPage. You'll add the login and logout functionality further down.
import React from 'react';
import { useAuth0 } from '@auth0/auth0-react';

export function LandingPage() {
  const { isAuthenticated, user } = useAuth0();

  return (
    <div>
      {!isAuthenticated ? (
          <div> Sorry, you're not authenticated :'(</div>
      ) : (
        <div style={{color: 'white'}}>
          <p>{user.email}</p>
        </div>
      )}
    </div>
  )
}
In the example above, if the user is authenticated, the user’s email will be rendered. If the user is not authenticated, the component will render a message, Sorry, you're not authenticated :'(.
Logging In and Out
Auth0 provides functions in the SDK for both logging in and out.
Let’s create new button components for each:
import { useAuth0 } from '@auth0/auth0-react';
import React from 'react';
import '../App.css';

function LoginButton() {
  const { loginWithRedirect } = useAuth0();

  return (
    <div>
      <button onClick={loginWithRedirect} className="loginButton">
        Login
      </button>
    </div>
  );
}

export default LoginButton;
import { useAuth0 } from "@auth0/auth0-react";
import React from "react";
import "../App.css";
function LogoutButton(props) {
const { logout } = useAuth0();
return (
<div>
<button onClick={logout} className="loginButton">
Logout
</button>
</div>
);
}
export default LogoutButton;And then import them into LandingPage
import React from 'react';
import LoginButton from './components/LoginButton';
import LogoutButton from './components/LogoutButton';
import { useAuth0 } from '@auth0/auth0-react';

export function LandingPage() {
  const { isAuthenticated, user } = useAuth0();

  return (
    <div>
      {!isAuthenticated ? (
          <LoginButton />
      ) : (
        <div style={{color: 'white'}}>
          <p>{user.email}</p>
          <LogoutButton />
        </div>
      )}
    </div>
  )
}
Make Sure It Works
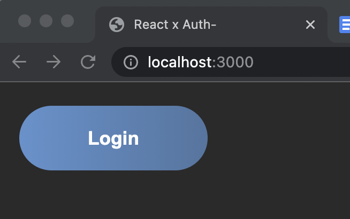
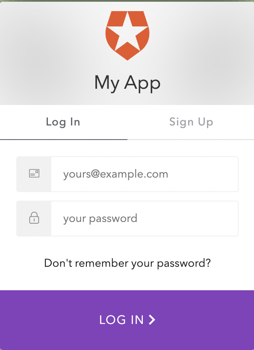
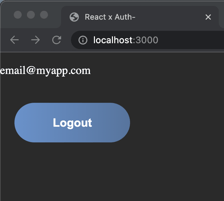
Clicking on LoginButton will call the loginWithRedirect method, which will redirect us to the Auth0 login/signup page. When you sign up and log in, Auth0 will redirect you back to your application and display your user info and LogoutButton.
That’s it!
You've successfully protected your application with Auth0 and given users the ability to log in and out of your application. This only scratches the surface of what Auth0 can do for your application, but now you can see how simple it is to set up.
What do you think?
We’d love to hear from you! Join the Bitovi Community Discord to chat about React, authentication, or anything else you’re working on. 🥚