End-to-end tests are meant to simulate a user interacting with your website. Selenium took the approach of building browser plugins that allow tests to interact with the browser, similar to how a user would. Cypress tests run inside the browser with an accompanying Node.js process for observing and controlling the network. This gives Cypress insights into the application's execution that Selenium doesn't have.
Read on for Cypress insights and how they impact writing Cypress code, and how Cypress can leverage existing Angular functionality to build tests for an application's complex parts.
Making Tests Work is Hard
A developer may know all the programming pieces of a test but still not be able to write ‘good’ tests. Think of a mechanic who can name every part of a car but cannot fix the car.
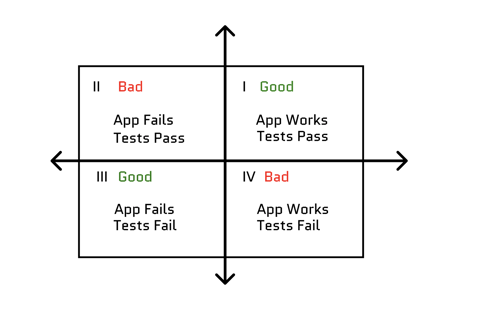
The hard part is going through the application and finding how to make tests that work when the application works (quadrant I) but fail when the application fails (quadrant III). These are the definitive tests. If the tests fail but the application works, those are flaky tests (quadrant II). If the tests pass but the application fails (quadrant IV), those tests are useless and should be fixed or removed.

Testing frameworks aim to create tests that stay in quadrants I and III.
Cypress can mock functionality so you can test large sections of an application. These are much larger than conventional unit tests but smaller than end-to-end tests. Cypress’s pragmatic approach to testing strikes a balance between unit tests' granularity and end-to-end tests' describable business actions. Ideally, unit tests can identify the line of code where an error is. Integration tests determine that an error exists in a general area. The nebulous 'area' entirely depends on the test, which pieces it's focusing on, and which parts are mocked out.
Disclaimer:
There are different opinions on what 'end-to-end' means. Here end-to-end means zero interference from the test and strictly simulating a user. Check out this blog post on the subject. In this article, I define an 'integration' test as a test that validates the behavior of two or more components. By executing these tests, you reach hard-to-access pieces by simulating a part of the application.
Cypress Under the Hood
While Selenium provides interactions with the browser, Cypress' architecture is the browser because it's built on Electron. Cypress can mock out network responses simulating the backend and send mock requests to the frontend. Further, Cypress's tests run within the browser, allowing direct calls to the Angular framework and your code. These direct calls from Cypress are how you mock out methods, UI, or network calls.
Cypress can be broken down into two main parts from this architecture. First, network control, second, browser control. Network control is the ability to inspect and modify the requests from the frontend to the backend or responses from the backend to the frontend. Browser control is the ability to interact with Angular and the application's code.
An Example App
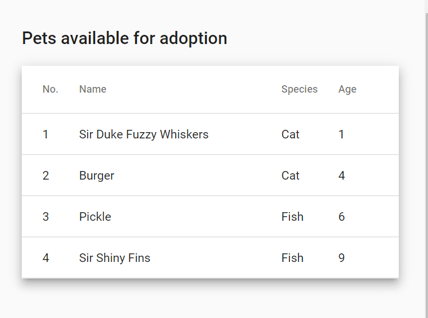
I'll use a simple 'Pet Adoption' app partially based on an existing backend API, swagger example app. This example consists of a table view of all pets available for adoption:

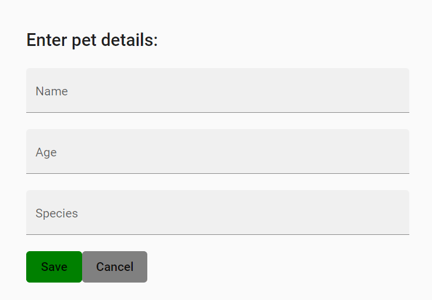
And a form view for adding new pets for adoption:

The two screens make up the basics of the example app. The screens above let you create tests that mimic common business cases for Cypress, like accomplishing form entry or having to mock out the network.
Cypress Network Control
Taking control of the network allows you to simulate the following scenarios:
-
no data returned
-
error responses
-
replace slow responses with quick ones
-
make requests regardless of the UI
I'll cover each of them below, but first, a look at what makes this possible.
Cypress syntax is based on 'cy' commands. These are the main entry point for how to interact with Cypress. The commands share a similar syntax of cy.functionName(functionArgs). The focus will be on the intercept command and request command for network control.
Intercepts allow for manipulation of the response, while Requests allow for manipulation of the request. From a front-end-centric view, Intercepts are designed to make the backend behave to test specific scenarios on the front end. The Requests operate similarly but in reverse, testing specific backend scenarios.
No Data Returned
Starting with the pet adoption app, you have the following:
Test Scenario: If there are no pets, display a message explaining how to add pets instead of displaying a table to the user.
Cypress can intercept the GET pets request that feeds into the table view, and regardless of the server, always return an empty list. By returning an empty list, you can test the behavior of no data. In Selenium, if your backend seeds pet data so there's always a pet, there's no way to test that the message appears. Cypress makes it much easier for you to simulate the GET pets request and make it return an empty list using the following code:
cy.intercept('/pets', { body: []});Now you can write tests around ensuring the UI displays the message about how a user can add pets. These kinds of tests help uncover errors before a user encounters them. For example, navigate to a page that displays the first pet added. If the markup has something like this:
<pet-display [pet]="pets[0]">This might work because of the application flow until a user without pets navigates there directly. You can test those scenarios without data returned long before your users do.
Simulate Error Responses
There are many ways for the network to fail, so much so that the number one fallacy in the Eight Fallacies of Distributed Computing is that "The Network is Reliable." There are various ways for applications to fail, so you want to ensure you can repeatedly test that the frontend can handle those failures.
Here's how you can intercept a save request to add a new pet to the pet adoption app:
cy.intercept('/pets', { statusCode: 500, body: { message: 'cannot '}});Intercepts help with testing the different error scenarios of your application without requiring the server to produce them. Intercepts are most valuable when validating varying error handling, specifically in microservice frameworks where one save button might create multiple rest requests. The test looks at the behavior of only one service being down.
Replace Slow/Non-deterministic Responses
Continuing with the pet adoption app, if the GET pets endpoint is slow and used throughout tests but doesn't change, it can burden all subsequent tests. It's good practice to have a happy path end-to-end test, but after that, use intercepts to help speed up the remainder of the tests.
cy.intercept('/pets', { body: [

  {name:'burger', species:'cat'},

  {name:'pickle', species:'fish'},

]});
Requests not available in the UI
Looking back on the Eight Fallacies, this one ties into the fallacy that "The Network is secure." The client can also be considered insecure. For example, despite your best efforts to sanitize input, a user could still bypass the frontend and directly call the backend. On the pet adoption app, if there is a requirement that the pet name has to be less than twenty characters, you can easily accomplish that with Angular:
form = this.fb.group({

  name: ['', [Validators.maxLength(20)]],

});
Problem solved. However, this doesn't stop someone from copying a successful request and reissuing it with a name 21 characters long. To replicate this type of request in Cypress, you can do the following:
cy.request(

  'POST',

  'https://localhost:3000/pets',

  { name: 'Sir Duke Fuzzy Whiskers', species: 'cat'}

).then((response) => expect(response.status).to.eq(400));
This Request validates that your backend is returning a bad request when failing the backend validation.
Cypress Browser Control
Cypress tests running from within the browser enable you to make direct calls to Angular. This includes firing manual change detection, calling specific component methods, and injecting form data. Each of these bypasses certain pieces of the Angular framework so that your integration tests can target the hard-to-reach places.
These tactics center around the use of the ng global functions. These commands also let developers use the browser command line to view and manipulate components. It does depend on running the Angular app in development mode.
Firing Manual Change Detection
There can be tests for a component with the change detection mode set to OnPush, where the test manually changes something that is usually kicked off from an input. Everything works in regular operation; however, the changes aren't reflected when trying to change that value from within the test. Getting the element reference and calling applyChanges can resolve this.
cy.get('element-name').as('elementRefs');

cy.window().then((window) => {

  window.ng.applyChanges(elementRefs);

});
Calling Specific Component Methods
When testing an Angular component using the tactics around mocking pieces of the network, you can test specific interactions with components. A use case for calling specific component methods is needing to bypass a bunch of work a user would have to do, like filling out many forms in a workflow. Building on the previous example, we'll use the same first two lines, but instead, you use getComponent to get a reference to the Angular component.
Say the Angular component looks more or less like the following, and you want to call the displayWarning method manually. With Selenium, you could click the increment button 100 times (which I'll use to represent a complex workflow process). However, when using Cypress, you can call displayWarning directly. While this might look accomplishable in a unit test, either incrementNumber or displayWarning could interact with the backend. If this were Selenium, the E2E test has to click the button 100 times, while if this were a unit test, all backend communication would be mocked out. Cypress hits that sweet spot in the middle.
@Component({

  selector: 'abc-hello',

  template: `

<h2>Hello World </h2>

<button (click)="incrementNumber()"

`

})

export class HelloComponent {

  count: number = 0;

  warningDisplayed: boolean = false;

  incrementNumber() {

    this.count++;

    if(this.count > 100) {

      this.displayWarning();

    }

  }

  displayWarning() {

    // complex warning code with backend communication

    this.warningDisplayed = true;

  }

}
The Cypress test would look like:
cy.get('abc-hello').as('elementRefs');

cy.window().then((window) => {

  const helloComponent = window.ng.getComponent(elementRefs[0]); // risk taker

  helloComponent.displayWarning();

  expect(helloComponent.warningDisplayed).to.eq(true);

});
Injecting Form Data
Lastly, I'll continue building on the getComponent examples to provide a way to inject form data without manually clicking on each input. As a form grows in complexity, it can get unwieldy for UI automation because there are more tabs, dropdowns, and other complex UI components. The more components on a page, the more challenging it is to test.
So now the component looks like:
@Component({

  selector: 'abc-hello-form',

  template: `<div [formGroup]="form">

    <label>name</label>

    <input type="text" formControlName="name">

    <label>species</label>

    <input type="text" formControlName="species">

  </div>'

})

export class HelloComponent {

  form = this.fb.form.group({

    name: null,

    species: null,

  });

  constructor(public fb: FormBuilder){}

}
Usually, we'd have to create a selector to target each input and enter the value correctly. For a canonical end-to-end test, that's correct, but let's take a shortcut.
cy.get('abc-hello-form').as('elementRefs');

cy.window().then((window) => {

  const helloComponent = window.ng.getComponent(elementRefs[0]); // risk taker

  helloComponent.form.patchValue({ // could use setValue for complete JSON

    name:'Sir Shiny Fins',

    species:'fish',

  });

  // validation assertions, save attempt etc

});
This has advantages because you aren't dependent on selectors and can adapt to changing forms.
In a Selenium world with a single abc-hello-form, you could do something like abc-hello-form input:nth-child(1) to select the name input. This works assuming the markup never changes. A quick resolution would be adding an ID or selecting by attribute, something like abc-hello-form input[formControlName="name"]. This makes the selector a bit more robust when changing the order of the inputs. However, it's easy to get wrapped up thinking this is the only component in existence. Whether that's multiple instances of abc-hello-form or other forms with similar markup, the more specific a selector has to become, the increased likelihood of breaking after minor changes.
Adding a non-required field to the form called 'nickname' probably shouldn't break existing tests. By selecting the component and patchValue, you can create robust tests that account for some modification.
Custom Cypress Commands
Consistency becomes an issue when expanding the above examples to an extensive application with many developers. To consistently apply these shortcuts there's Cypress' Custom Commands. These allow you to take the above code: “patching JSON to a form” and convert it into a custom Cypress command to be reused through the application.
Cypress.Commands.add('patchFormValue', (selector: string, formJson: any) => {
-  cy.get('abc-hello-form').as('elementRefs');
+  cy.get(selector).as('elementRefs');
  cy.window().then((window) => {
    const helloComponent = window.ng.getComponent(elementRefs[0]); // risk taker
-    helloComponent.form.patchValue({ // could use setValue for complete JSON
-      name:'Sir Shiny Fins',
-      species:'fish',
-    });
+    helloComponent.form.patchValue(formJson);
  });
});
Cypress is an excellent tool for end-to-end tests. Using these recipes to build out integration tests shifts the focus to the frontend or backend-centric tests. These tests enable validating edge and worst-case scenarios where the frontend or backend data isn't perfect.
Conclusion
All this testing may seem daunting, but the rewards are high. These integration tests help shift strain from quality assurance executing tests to making them. The Cypress integration tests help relieve strain from quality assurance and developers by validating scenarios that are difficult to replicate manually or with end-to-end testing.
If you want to learn more about Cypress and how to get started using it, there's an excellent blog post here.
Previous Post


