Integrating Maps page
Learn how to integrate Google Maps into your React Native application.
Overview
In this section, you will:
- Render Google Maps.
- Store secrets with Gradle.
- Configure the Android Manifest file.
- Add markers to a map.
Objective 1: Add a map view
A list of restaurants is a good start, but showing them on a map would make it easier to visualize where they are.
Let’s start by adding a map to the application. We’ll add a Tab component to switch between the List and Map views.
Rendering Google Maps
To use the Google Maps API, you will need to set up a Google Maps API key.
In this section, we will be using the react-native-maps package to integrate Google Maps into our application.
This library provides several React Native components such as maps, polygons, markers, and more that can be used to build maps on both iOS and Android.
For the purpose of this course, we will focus on using the map and marker components.
import MapView, { PROVIDER_GOOGLE } from "react-native-maps"

function Map() {
  return (
    <MapView
      style={{ minHeight: "100%" }}
      provider={PROVIDER_GOOGLE}
      loadingEnabled
      initialRegion={{
        latitude: 37.78825,
        longitude: -122.4324,
        latitudeDelta: 0.0922,
        longitudeDelta: 0.0421,
      }}
    ></MapView>
  )
}
The MapView component is the main component that we will be using to render the map. Because we are using a React Native library, we will later be able to pass child components to the MapView component to render Markers and other map elements.
The component takes several props, but the most important ones are:
style: The regularstyleprop applied to other compoennts.provider: The map provider. In this case, we are using Google Maps.loadingEnabled: Whether to show a loading indicator while the map is loading.initialRegion: An object that contains coordinates for the initial map region. The object should contain:latitudeandlongitude: the coordinates of the center of the map.latitudeDeltaandlongitudeDelta: the vertical and horizontal zoom levels of the map.
Storing secrets with Gradle
Gradle is a powerful build system used in Android development. It automates the building, testing, and deployment of your app.
In a React Native project, you’ll encounter two key Gradle files:
android/build.gradle(project level): Located at the root of your android directory, it defines build configurations and dependencies that apply to all modules in your project.android/app/build.gradle(app level): Located inandroid/app, it specifies configurations for the app module, including dependencies, SDK versions, and build types.
Gradle allows you to define how your project is structured, manage dependencies, and configure the build process in a flexible and customizable way.
Using secrets-gradle-plugin
Managing sensitive information like API keys securely is critical in mobile app development.
The secrets-gradle-plugin helps you handle such secrets without exposing them in your source code.
In our application, we will add a dependency to the project-level Gradle file:
buildscript {
    ext {
        buildToolsVersion = "34.0.0"
        minSdkVersion = 23
        compileSdkVersion = 34
        targetSdkVersion = 34
        ndkVersion = "26.1.10909125"
        kotlinVersion = "1.9.22"
    }
    repositories {
        google()
        mavenCentral()
    }
    dependencies {
        classpath("com.android.tools.build:gradle")
        classpath("com.facebook.react:react-native-gradle-plugin")
        classpath("org.jetbrains.kotlin:kotlin-gradle-plugin")
        classpath("com.google.android.libraries.mapsplatform.secrets-gradle-plugin:secrets-gradle-plugin:2.0.1")
    }
}

apply plugin: "com.facebook.react.rootproject"
…then apply it in the app-level Gradle file:
apply plugin: "com.android.application"
apply plugin: "org.jetbrains.kotlin.android"
apply plugin: "com.facebook.react"
apply plugin: "com.google.android.libraries.mapsplatform.secrets-gradle-plugin"

/**
 * This is the configuration block to customize your React Native Android app.
 * By default you don't need to apply any configuration, just uncomment the lines you need.
 */
react {
    /* Folders */
    //   The root of your project, i.e. where "package.json" lives. Default is '..'
    // root = file("../")
    //   The folder where the react-native NPM package is. Default is ../node_modules/react-native
    // reactNativeDir = file("../node_modules/react-native")
    //   The folder where the react-native Codegen package is. Default is ../node_modules/@react-native/codegen
    // codegenDir = file("../node_modules/@react-native/codegen")
    //   The cli.js file which is the React Native CLI entrypoint. Default is ../node_modules/react-native/cli.js
    // cliFile = file("../node_modules/react-native/cli.js")

    /* Variants */
    //   The list of variants to that are debuggable. For those we're going to
    //   skip the bundling of the JS bundle and the assets. By default is just 'debug'.
    //   If you add flavors like lite, prod, etc. you'll have to list your debuggableVariants.
    // debuggableVariants = ["liteDebug", "prodDebug"]

    /* Bundling */
    //   A list containing the node command and its flags. Default is just 'node'.
    // nodeExecutableAndArgs = ["node"]
    //
    //   The command to run when bundling. By default is 'bundle'
    // bundleCommand = "ram-bundle"
    //
    //   The path to the CLI configuration file. Default is empty.
    // bundleConfig = file(../rn-cli.config.js)
    //
    //   The name of the generated asset file containing your JS bundle
    // bundleAssetName = "MyApplication.android.bundle"
    //
    //   The entry file for bundle generation. Default is 'index.android.js' or 'index.js'
    // entryFile = file("../js/MyApplication.android.js")
    //
    //   A list of extra flags to pass to the 'bundle' commands.
    //   See https://github.com/react-native-community/cli/blob/main/docs/commands.md#bundle
    // extraPackagerArgs = []

    /* Hermes Commands */
    //   The hermes compiler command to run. By default it is 'hermesc'
    // hermesCommand = "$rootDir/my-custom-hermesc/bin/hermesc"
    //
    //   The list of flags to pass to the Hermes compiler. By default is "-O", "-output-source-map"
    // hermesFlags = ["-O", "-output-source-map"]
}

/**
 * Set this to true to Run Proguard on Release builds to minify the Java bytecode.
 */
def enableProguardInReleaseBuilds = false

/**
 * The preferred build flavor of JavaScriptCore (JSC)
 *
 * For example, to use the international variant, you can use:
 * `def jscFlavor = 'org.webkit:android-jsc-intl:+'`
 *
 * The international variant includes ICU i18n library and necessary data
 * allowing to use e.g. `Date.toLocaleString` and `String.localeCompare` that
 * give correct results when using with locales other than en-US. Note that
 * this variant is about 6MiB larger per architecture than default.
 */
def jscFlavor = 'org.webkit:android-jsc:+'

android {
    ndkVersion rootProject.ext.ndkVersion
    buildToolsVersion rootProject.ext.buildToolsVersion
    compileSdk rootProject.ext.compileSdkVersion

    namespace "com.placemyorder"
    defaultConfig {
        applicationId "com.placemyorder"
        minSdkVersion rootProject.ext.minSdkVersion
        targetSdkVersion rootProject.ext.targetSdkVersion
        versionCode 1
        versionName "1.0"
    }
    signingConfigs {
        debug {
            storeFile file('debug.keystore')
            storePassword 'android'
            keyAlias 'androiddebugkey'
            keyPassword 'android'
        }
    }
    buildTypes {
        debug {
            signingConfig signingConfigs.debug
        }
        release {
            // Caution! In production, you need to generate your own keystore file.
            // see https://reactnative.dev/docs/signed-apk-android.
            signingConfig signingConfigs.debug
            minifyEnabled enableProguardInReleaseBuilds
            proguardFiles getDefaultProguardFile("proguard-android.txt"), "proguard-rules.pro"
        }
    }
}

dependencies {
    // The version of react-native is set by the React Native Gradle Plugin
    implementation("com.facebook.react:react-android")

    if (hermesEnabled.toBoolean()) {
        implementation("com.facebook.react:hermes-android")
    } else {
        implementation jscFlavor
    }
}

secrets {
    // Optionally specify a different file name containing your secrets.
    // The plugin defaults to "local.properties"
    propertiesFileName = "secrets.properties"

    // A properties file containing default secret values. This file can be
    // checked in version control.
    defaultPropertiesFileName = "local.defaults.properties"

    // Configure which keys should be ignored by the plugin by providing regular expressions.
    // "sdk.dir" is ignored by default.
    ignoreList.add("keyToIgnore") // Ignore the key "keyToIgnore"
    ignoreList.add("sdk.*")       // Ignore all keys matching the regexp "sdk.*"
}

apply from: file("../../node_modules/@react-native-community/cli-platform-android/native_modules.gradle"); applyNativeModulesAppBuildGradle(project)

apply from: file("../../node_modules/react-native-vector-icons/fonts.gradle")
Configuring the Android Manifest file
The Android Manifest file is an XML file that contains important information about our application such as permissions, activities and services, configuration settings, and more.
The Android manifest file (AndroidManifest.xml) is a crucial part of any Android application.
It resides in the android/app/src/main/ directory of your React Native project.
This XML file provides essential information to the Android operating system about your app, such as:
- Package name: Unique identifier for your app.
- Components: Declares components of your app (activities, services, broadcast receivers, and content providers).
- Permissions: Specifies permissions your app needs (e.g., internet access, camera usage).
- App metadata: Includes additional information like themes, icons, and minimum API levels.
In essence, the manifest file acts as a roadmap for the Android OS to understand and manage your app correctly.
<manifest xmlns:android="http://schemas.android.com/apk/res/android">

    <uses-permission android:name="android.permission.INTERNET" />

    <application
      android:name=".MainApplication"
      android:label="@string/app_name"
      android:icon="@mipmap/ic_launcher"
      android:roundIcon="@mipmap/ic_launcher_round"
      android:allowBackup="false"
      android:theme="@style/AppTheme">
      <activity
        android:name=".MainActivity"
        android:label="@string/app_name"
        android:configChanges="keyboard|keyboardHidden|orientation|screenLayout|screenSize|smallestScreenSize|uiMode"
        android:launchMode="singleTask"
        android:windowSoftInputMode="adjustResize"
        android:exported="true">
        <intent-filter>
            <action android:name="android.intent.action.MAIN" />
            <category android:name="android.intent.category.LAUNCHER" />
        </intent-filter>
      </activity>
      <meta-data
        android:name="com.google.android.geo.API_KEY"
        android:value="${GOOGLE_MAPS_API_KEY}"/>
    </application>
</manifest>
Setup 1
✏️ Install the new dependency:
npm install react-native-maps@1
✏️ Update .gitignore to be:
# OSX
#
.DS_Store

# Windows
#
Thumbs.db

# Xcode
#
build/
*.pbxuser
!default.pbxuser
*.mode1v3
!default.mode1v3
*.mode2v3
!default.mode2v3
*.perspectivev3
!default.perspectivev3
xcuserdata
*.xccheckout
*.moved-aside
DerivedData
*.hmap
*.ipa
*.xcuserstate
**/.xcode.env.local

# Android/IntelliJ
#
build/
.idea
.gradle
local.properties
*.iml
*.hprof
.cxx/
*.keystore
!debug.keystore

# node.js
#
node_modules/
npm-debug.log
yarn-error.log

# fastlane
#
# It is recommended to not store the screenshots in the git repo. Instead, use fastlane to re-generate the
# screenshots whenever they are needed.
# For more information about the recommended setup visit:
# https://docs.fastlane.tools/best-practices/source-control/

**/fastlane/report.xml
**/fastlane/Preview.html
**/fastlane/screenshots
**/fastlane/test_output

# Bundle artifact
*.jsbundle
*.tsbuildinfo

# Environment variables
.env

# Place My Order API
/db-data

# Ruby / CocoaPods
**/Pods/
/vendor/bundle/

# Secrets
android/secrets.properties

# Temporary files created by Metro to check the health of the file watcher
.metro-health-check*

# testing
/coverage

# Yarn
.yarn/*
!.yarn/patches
!.yarn/plugins
!.yarn/releases
!.yarn/sdks
!.yarn/versions
✏️ Create android/local.defaults.properties and update it to be:
GOOGLE_MAPS_API_KEY=INVALID_API_KEY
✏️ Duplicate android/local.defaults.properties to android/secrets.properties in your project.
It’s always a good idea to keep a local.defaults.properties file up to date (and committed to git) in your project, then include the actual secrets in your local secrets.properties file (and not committed to git).
✏️ Update android/secrets.properties to include your GOOGLE_MAPS_API_KEY key.
Replace the INVALID_API_KEY text that’s currently in the file with your key.
✏️ Update android/build.gradle to be:
buildscript {
    ext {
        buildToolsVersion = "34.0.0"
        minSdkVersion = 23
        compileSdkVersion = 34
        targetSdkVersion = 34
        ndkVersion = "26.1.10909125"
        kotlinVersion = "1.9.22"
    }
    repositories {
        google()
        mavenCentral()
    }
    dependencies {
        classpath("com.android.tools.build:gradle")
        classpath("com.facebook.react:react-native-gradle-plugin")
        classpath("org.jetbrains.kotlin:kotlin-gradle-plugin")
        classpath("com.google.android.libraries.mapsplatform.secrets-gradle-plugin:secrets-gradle-plugin:2.0.1")
    }
}

apply plugin: "com.facebook.react.rootproject"
✏️ Update android/app/build.gradle to be:
apply plugin: "com.android.application"
apply plugin: "org.jetbrains.kotlin.android"
apply plugin: "com.facebook.react"
apply plugin: "com.google.android.libraries.mapsplatform.secrets-gradle-plugin"

/**
 * This is the configuration block to customize your React Native Android app.
 * By default you don't need to apply any configuration, just uncomment the lines you need.
 */
react {
    /* Folders */
    //   The root of your project, i.e. where "package.json" lives. Default is '..'
    // root = file("../")
    //   The folder where the react-native NPM package is. Default is ../node_modules/react-native
    // reactNativeDir = file("../node_modules/react-native")
    //   The folder where the react-native Codegen package is. Default is ../node_modules/@react-native/codegen
    // codegenDir = file("../node_modules/@react-native/codegen")
    //   The cli.js file which is the React Native CLI entrypoint. Default is ../node_modules/react-native/cli.js
    // cliFile = file("../node_modules/react-native/cli.js")

    /* Variants */
    //   The list of variants to that are debuggable. For those we're going to
    //   skip the bundling of the JS bundle and the assets. By default is just 'debug'.
    //   If you add flavors like lite, prod, etc. you'll have to list your debuggableVariants.
    // debuggableVariants = ["liteDebug", "prodDebug"]

    /* Bundling */
    //   A list containing the node command and its flags. Default is just 'node'.
    // nodeExecutableAndArgs = ["node"]
    //
    //   The command to run when bundling. By default is 'bundle'
    // bundleCommand = "ram-bundle"
    //
    //   The path to the CLI configuration file. Default is empty.
    // bundleConfig = file(../rn-cli.config.js)
    //
    //   The name of the generated asset file containing your JS bundle
    // bundleAssetName = "MyApplication.android.bundle"
    //
    //   The entry file for bundle generation. Default is 'index.android.js' or 'index.js'
    // entryFile = file("../js/MyApplication.android.js")
    //
    //   A list of extra flags to pass to the 'bundle' commands.
    //   See https://github.com/react-native-community/cli/blob/main/docs/commands.md#bundle
    // extraPackagerArgs = []

    /* Hermes Commands */
    //   The hermes compiler command to run. By default it is 'hermesc'
    // hermesCommand = "$rootDir/my-custom-hermesc/bin/hermesc"
    //
    //   The list of flags to pass to the Hermes compiler. By default is "-O", "-output-source-map"
    // hermesFlags = ["-O", "-output-source-map"]
}

/**
 * Set this to true to Run Proguard on Release builds to minify the Java bytecode.
 */
def enableProguardInReleaseBuilds = false

/**
 * The preferred build flavor of JavaScriptCore (JSC)
 *
 * For example, to use the international variant, you can use:
 * `def jscFlavor = 'org.webkit:android-jsc-intl:+'`
 *
 * The international variant includes ICU i18n library and necessary data
 * allowing to use e.g. `Date.toLocaleString` and `String.localeCompare` that
 * give correct results when using with locales other than en-US. Note that
 * this variant is about 6MiB larger per architecture than default.
 */
def jscFlavor = 'org.webkit:android-jsc:+'

android {
    ndkVersion rootProject.ext.ndkVersion
    buildToolsVersion rootProject.ext.buildToolsVersion
    compileSdk rootProject.ext.compileSdkVersion

    namespace "com.placemyorder"
    defaultConfig {
        applicationId "com.placemyorder"
        minSdkVersion rootProject.ext.minSdkVersion
        targetSdkVersion rootProject.ext.targetSdkVersion
        versionCode 1
        versionName "1.0"
    }
    signingConfigs {
        debug {
            storeFile file('debug.keystore')
            storePassword 'android'
            keyAlias 'androiddebugkey'
            keyPassword 'android'
        }
    }
    buildTypes {
        debug {
            signingConfig signingConfigs.debug
        }
        release {
            // Caution! In production, you need to generate your own keystore file.
            // see https://reactnative.dev/docs/signed-apk-android.
            signingConfig signingConfigs.debug
            minifyEnabled enableProguardInReleaseBuilds
            proguardFiles getDefaultProguardFile("proguard-android.txt"), "proguard-rules.pro"
        }
    }
}

dependencies {
    // The version of react-native is set by the React Native Gradle Plugin
    implementation("com.facebook.react:react-android")

    if (hermesEnabled.toBoolean()) {
        implementation("com.facebook.react:hermes-android")
    } else {
        implementation jscFlavor
    }
}

secrets {
    // Optionally specify a different file name containing your secrets.
    // The plugin defaults to "local.properties"
    propertiesFileName = "secrets.properties"

    // A properties file containing default secret values. This file can be
    // checked in version control.
    defaultPropertiesFileName = "local.defaults.properties"

    // Configure which keys should be ignored by the plugin by providing regular expressions.
    // "sdk.dir" is ignored by default.
    ignoreList.add("keyToIgnore") // Ignore the key "keyToIgnore"
    ignoreList.add("sdk.*")       // Ignore all keys matching the regexp "sdk.*"
}

apply from: file("../../node_modules/@react-native-community/cli-platform-android/native_modules.gradle"); applyNativeModulesAppBuildGradle(project)

apply from: file("../../node_modules/react-native-vector-icons/fonts.gradle")
✏️ Update android/app/src/main/AndroidManifest.xml to be:
<manifest xmlns:android="http://schemas.android.com/apk/res/android">

    <uses-permission android:name="android.permission.INTERNET" />

    <application
      android:name=".MainApplication"
      android:label="@string/app_name"
      android:icon="@mipmap/ic_launcher"
      android:roundIcon="@mipmap/ic_launcher_round"
      android:allowBackup="false"
      android:theme="@style/AppTheme">
      <activity
        android:name=".MainActivity"
        android:label="@string/app_name"
        android:configChanges="keyboard|keyboardHidden|orientation|screenLayout|screenSize|smallestScreenSize|uiMode"
        android:launchMode="singleTask"
        android:windowSoftInputMode="adjustResize"
        android:exported="true">
        <intent-filter>
            <action android:name="android.intent.action.MAIN" />
            <category android:name="android.intent.category.LAUNCHER" />
        </intent-filter>
      </activity>
      <meta-data
        android:name="com.google.android.geo.API_KEY"
        android:value="${GOOGLE_MAPS_API_KEY}"/>
    </application>
</manifest>
✏️ Terminate the existing dev server and start it again:
npm run start
✏️ Create src/components/Tabs/Tabs.tsx and update it to be:
import { Pressable, StyleSheet } from "react-native"

import Box from "../../design/Box"
import { Theme, useTheme } from "../../design/theme"
import Typography from "../../design/Typography"

export interface TabsProps {
  options: Array<{
    label: string
    value: string
  }>
  value: string
  onChange: (value: string) => void
}

const Tabs: React.FC<TabsProps> = ({ options, value: activeTab, onChange }) => {
  const theme = useTheme()
  const styles = getStyles(theme)

  return (
    <Box style={styles.wrapper}>
      {options.map(({ value, label }) => {
        const isActive = value === activeTab

        return (
          <Pressable
            key={value}
            onPress={() => onChange(value)}
            style={StyleSheet.compose(styles.tab, isActive && styles.activeTab)}
          >
            <Typography
              variant="title"
              style={StyleSheet.compose(
                styles.tabText,
                isActive && styles.activeTabText,
              )}
            >
              {label}
            </Typography>
          </Pressable>
        )
      })}
    </Box>
  )
}

export default Tabs

function getStyles(theme: Theme) {
  return StyleSheet.create({
    wrapper: {
      flexDirection: "row",
    },
    tab: {
      flex: 1,
      alignItems: "center",
      padding: theme.spacing.m,
      borderWidth: 1,

      borderColor: theme.palette.primary.main,
      backgroundColor: theme.palette.screen.main,
    },
    tabText: {
      color: theme.palette.screen.contrast,
    },
    activeTab: {
      backgroundColor: theme.palette.primary.main,
    },
    activeTabText: {
      color: theme.palette.primary.contrast,
    },
  })
}
✏️ Create src/components/Tabs/index.ts and update it to be:
export { default } from "./Tabs"
export * from "./Tabs"
✏️ Create src/screens/RestaurantList/components/List/List.tsx and update it to be:
import { useNavigation } from "@react-navigation/native"
import { FlatList } from "react-native"

import Button from "../../../../design/Button"
import Screen from "../../../../design/Screen"
import { Restaurant } from "../../../../services/pmo/restaurant"

export interface ListProps {
  restaurants: Restaurant[]
}

const List: React.FC<ListProps> = ({ restaurants }) => {
  const navigation = useNavigation()

  return (
    <Screen noScroll>
      <FlatList
        data={restaurants}
        renderItem={({ item: restaurant }) => (
          <Button
            onPress={() => {
              navigation.navigate("RestaurantDetails", {
                slug: restaurant.slug,
              })
            }}
          >
            {restaurant.name}
          </Button>
        )}
        keyExtractor={(item) => item._id}
      />
    </Screen>
  )
}

export default List
✏️ Create src/screens/RestaurantList/components/List/index.ts and update it to be:
export { default } from "./List"
export * from "./List"
✏️ Create src/screens/RestaurantList/components/Map/Map.tsx and update it to be:
import MapView, { PROVIDER_GOOGLE } from "react-native-maps"

import { Restaurant } from "../../../../services/pmo/restaurant"

export interface MapProps {
  restaurants: Restaurant[]
}

const Map: React.FC<MapProps> = ({ restaurants }) => {
  // Exercise: Implement MapView to accept an initialRegion based on the coordinates of one of the restaurants passed.
}

export default Map
✏️ Create src/screens/RestaurantList/components/Map/index.ts and update it to be:
export { default } from "./Map"
export * from "./Map"
✏️ Update src/screens/RestaurantList/RestaurantList.tsx to be:
import { StackScreenProps } from "@react-navigation/stack"
import { useState } from "react"

import { RestaurantsStackParamList } from "../../App"
import Loading from "../../components/Loading"
import Tabs from "../../components/Tabs"
import Box from "../../design/Box"
import Screen from "../../design/Screen"
import Typography from "../../design/Typography"
import { useRestaurants } from "../../services/pmo/restaurant"

import List from "./components/List"
import Map from "./components/Map"

export interface RestaurantListProps
  extends StackScreenProps<RestaurantsStackParamList, "RestaurantList"> {}

const RestaurantList: React.FC<RestaurantListProps> = ({ route }) => {
  const { state, city } = route.params
  const {
    data: restaurants,
    error,
    isPending,
  } = useRestaurants({ state: state.short, city: city.name })

  const [tab, setTab] = useState<string>("list")

  if (error) {
    return (
      <Screen>
        <Box padding="m">
          <Typography variant="heading">Error loading restaurants: </Typography>
          <Typography variant="body">{error.message}</Typography>
        </Box>
      </Screen>
    )
  }

  if (isPending) {
    return <Loading />
  }

  return (
    <>
      <Tabs
        options={[
          { label: "List", value: "list" },
          { label: "Map", value: "map" },
        ]}
        onChange={setTab}
        value={tab}
      />

      <Screen noScroll>
        {tab === "list" && restaurants && <List restaurants={restaurants} />}
        {tab === "map" && restaurants && <Map restaurants={restaurants} />}
      </Screen>
    </>
  )
}

export default RestaurantList
Verify 1
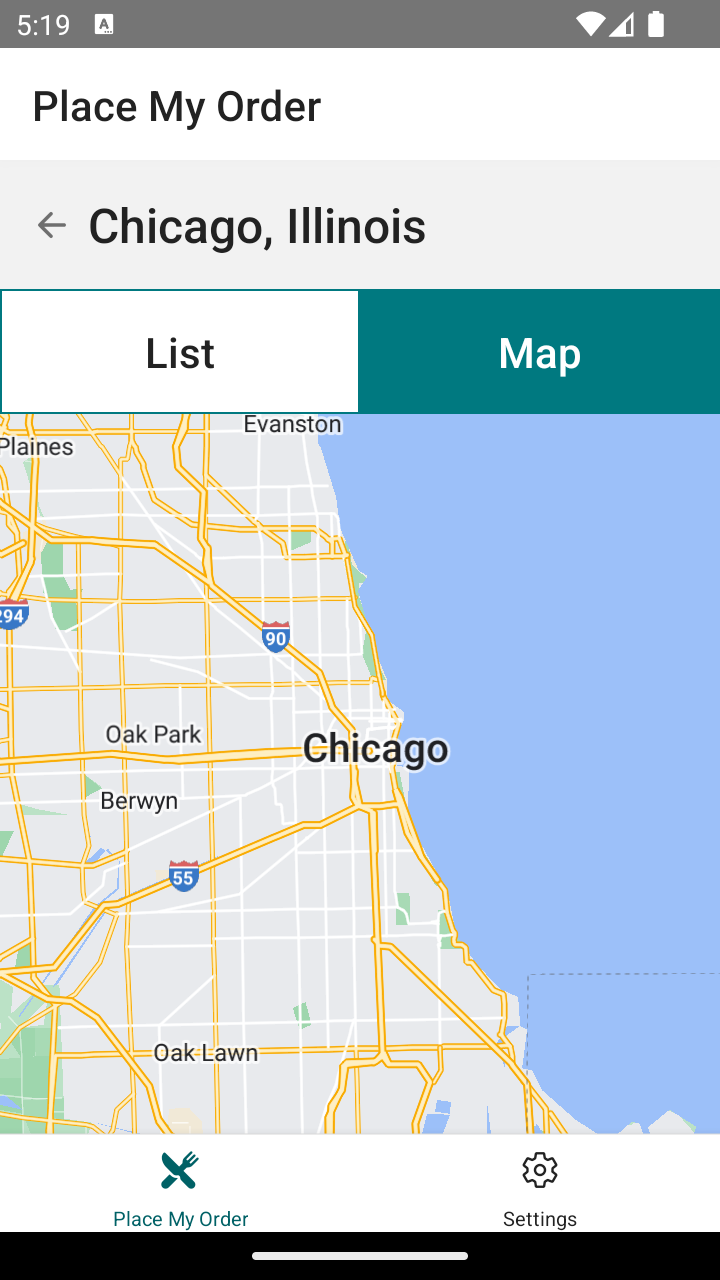
Navigate to the Maps tab of the RestaurantsList in your emulator and verify that the Map is rendering.
Exercise 1
For this exercise, implement Google Map’s MapView for it to properly render when the Map tab is selected.
Hint: The MapView takes its own style prop.
As a minimum it needs minHeight variable to render.
If the view is too small, try adding another variable to increase its size.
<MapView style={{ minHeight: "100%" }} />
Solution 1
If you’ve implemented the solution correctly, the Map should be rendering in your application.
Click to see the solution
✏️ Update src/screens/RestaurantList/components/Map/Map.tsx to be:
import MapView, { PROVIDER_GOOGLE } from "react-native-maps"

import { Restaurant } from "../../../../services/pmo/restaurant"

export interface MapProps {
  restaurants: Restaurant[]
}

const Map: React.FC<MapProps> = ({ restaurants }) => {
  return (
    <MapView
      style={{ minHeight: "100%" }}
      provider={PROVIDER_GOOGLE}
      initialRegion={{
        ...restaurants[0].coordinate,
        latitudeDelta: 0.27,
        longitudeDelta: 0.5,
      }}
      loadingEnabled
    />
  )
}

export default Map
Objective 2: Add restaurant markers with tooltips to the map
Now that we have a map, let’s add markers for each one of the restaurants. When we tap on them, we will navigate to the restaurant detail page, just like we do in the list view.
Adding markers to a map
The Marker component is used to render a pin on the map. It takes several props, but the most important ones are:
coordinate: The coordinates of the marker.onCalloutPress: A function that is called when the callout view is pressed.title: The title of the callout view.description: A description displayed in the callout view.
The callout view is an info window that is displayed when the marker is tapped.
import MapView, { Marker, PROVIDER_GOOGLE } from "react-native-maps"

function MapWithMarker({ initialRegion }) {
  return (
    <MapView
      style={{ minHeight: "100%" }}
      provider={PROVIDER_GOOGLE}
      initialRegion={initialRegion}
    >
      <Marker
        coordinate={{
          latitude: 37.78825,
          longitude: -122.4324,
        }}
        onCalloutPress={() => {
          console.info("Marker was pressed")
        }}
        title="Title of the Marker"
        description="A brief description"
      />
    </MapView>
  )
}
Setup 2
✏️ Update src/screens/RestaurantList/components/Map/Map.tsx to be:
import { useNavigation } from "@react-navigation/native"
import MapView, { Marker, PROVIDER_GOOGLE } from "react-native-maps"

import { Restaurant } from "../../../../services/pmo/restaurant"

export interface MapProps {
  restaurants: Restaurant[]
}

const Map: React.FC<MapProps> = ({ restaurants }) => {
  return (
    <MapView
      style={{ minHeight: "100%" }}
      provider={PROVIDER_GOOGLE}
      initialRegion={{
        ...restaurants[0].coordinate,
        latitudeDelta: 0.27,
        longitudeDelta: 0.5,
      }}
      loadingEnabled
    >
      {/* Exercise: Using the restaurants prop, create a Marker for each restaurant. */}
    </MapView>
  )
}

export default Map
Verify 2
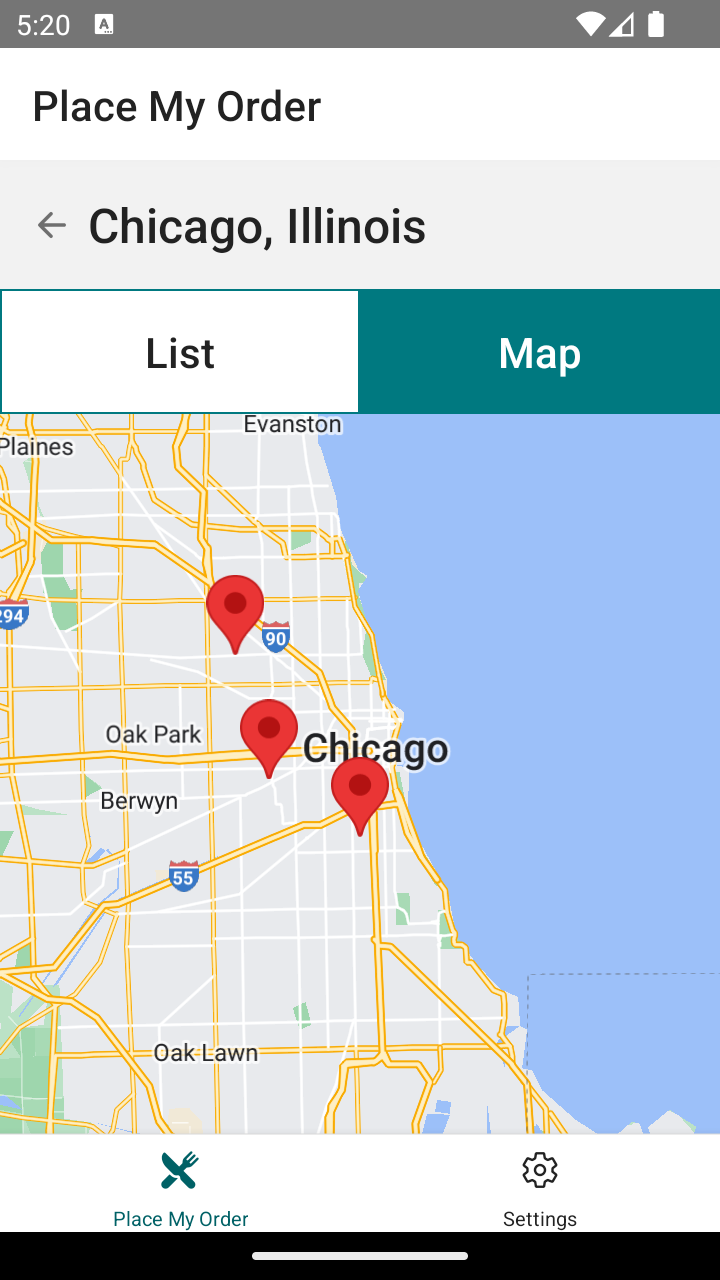
Navigate to the Maps tab of the RestaurantsList in your emulator and verify that the Map is rendering.
Exercise 2
- Using the
restaurantsprop, create aMarkerfor each restaurant. - Fill out the
coordinate,title, anddescriptionproperties on Marker. - Use
onCallOutPressto addnavigateto theRestaurantDetailsscreen.
Solution 2
If you’ve implemented the solution correctly, your Map should have Markers based on the coordinates of each Restaurant. Then, when you tap on a marker, it should show its info in a pop-up view. Then, you can tap on the pop-up view to navigate to the restaurant details view.
Click to see the solution
✏️ Update src/screens/RestaurantList/components/Map/Map.tsx to be:
import { useNavigation } from "@react-navigation/native"
import MapView, { Marker, PROVIDER_GOOGLE } from "react-native-maps"

import { Restaurant } from "../../../../services/pmo/restaurant"

export interface MapProps {
  restaurants: Restaurant[]
}

const Map: React.FC<MapProps> = ({ restaurants }) => {
  const navigation = useNavigation()

  return (
    <MapView
      style={{ minHeight: "100%" }}
      provider={PROVIDER_GOOGLE}
      initialRegion={{
        ...restaurants[0].coordinate,
        latitudeDelta: 0.27,
        longitudeDelta: 0.5,
      }}
      loadingEnabled
    >
      {restaurants.map((restaurant, index) => (
        <Marker
          key={index}
          coordinate={restaurant.coordinate}
          title={restaurant.name}
          description={restaurant.address?.street}
          onCalloutPress={() =>
            navigation.navigate("RestaurantDetails", {
              slug: restaurant.slug,
            })
          }
        />
      ))}
    </MapView>
  )
}

export default Map
Next steps
We’ve accomplished a lot for our React Native App, in order to polish it just a bit more let’s get into some Performance and Optimization practices.